The ability to capture your iPhone screen has become an invaluable tool for various purposes. Whether you’re a content creator, a tech-savvy enthusiast, or simply want to demonstrate a process to a friend, screen recording on your iPhone can be a powerful tool. With just a few taps, you can record your screen effortlessly.
Why Screen Record on iPhone?
● Tutorial Creation: Easily create tutorials to guide others through processes, apps, or features on your iPhone.
● Bug Reporting: Capture and share bugs or issues you encounter with apps or software.
● Content Creation: Record gameplay, app demos, or presentations for sharing on social media or with friends.
● Educational Purposes: Record lectures, presentations, or online courses for future reference.
● Remote Collaboration: Collaborate with remote colleagues by sharing your screen during video calls.
The Built-in Screen Recording Feature
Fortunately, you don’t need to download any additional apps to start screen recording on your iPhone. Apple has thoughtfully integrated this functionality directly into the iOS system, readily accessible through the Control Center. Here’s how to activate and utilize this feature:
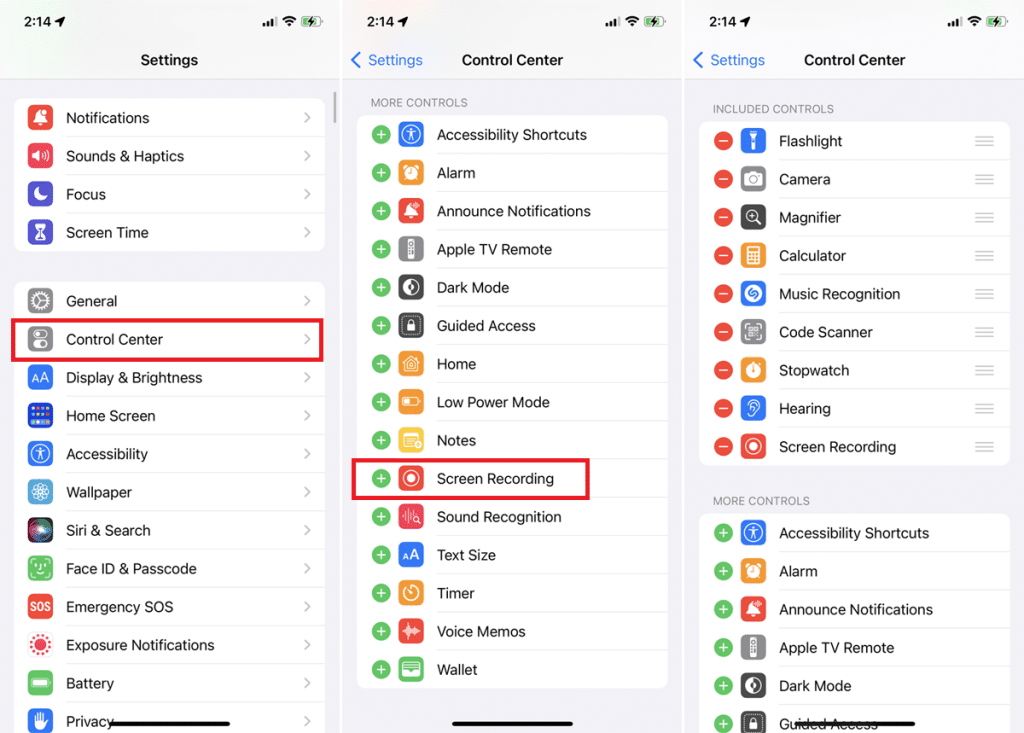
- Navigate to your iPhone’s Settings and tap on Control Center.
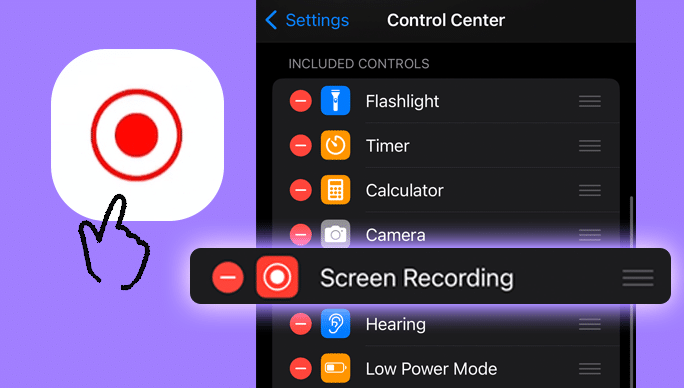
- Scroll down to the More Controls section and locate Screen Recording. Tap the (+) sign next to it to add it to your active Control Center controls.
- Swipe down from the top-right corner of your screen (iPhones with Face ID) or swipe up from the bottom of the screen (iPhones with a Home button) to open the Control Center.
Initiate the Recording Process
- In the Control Center, you’ll now see a new circular icon with a recording symbol inside – that’s your screen recording button.
- Tap the screen recording button once. A short, three-second countdown will appear on your screen, giving you a moment to prepare for what you want to capture.
Optional
If you want to narrate your recording, hold down the s-recording button instead of tapping it once. This will display an option to “Turn Microphone On”. Tap on it to enable audio recording.
How to Screen Record on iPhone?

Step 1: Enable Screen Recording
● Open the “Settings” app on your iPhone.
● Scroll down and tap on “Control Center.”
● Locate “S-Recording” and tap the green “+” button next to it to add it to your
Control Center.
Step 2: Access Control Center
● Swipe down from the top-right corner of your iPhone screen (iPhone X and later) or swipe up from the bottom of the screen (iPhone 8 and earlier) to access the Control Center.
Step 3: Initiate Screen Recording
● Tap the screen recording icon (circle with a dot inside) in the Control Center .
Step 4: Customize Screen Recording (Optional)
● To record your voice or other audio, long-press or 3D touch the screen recording icon.
● Tap the microphone icon to turn on audio recording.
● You can also enable or disable microphone audio from this menu.
Step 5: Start Recording
● After customizing your preferences, tap “Start Recording.”
● A three-second countdown will appear, giving you time to navigate to the screen you want to record.
Step 6: Stop Recording
● To stop recording, tap the red status bar at the top of your screen.
● Alternatively, access the Control Center and tap the screen recording icon again.
Step 7: Access Your Recording
● On stopping, your screen recording will be saved to your Photos app automatically.
Step 8: Find Your Screen Recording
Your recording will be automatically saved in the Photos app, specifically within the “Videos” album. You can access it like any other video on your iPhone, allowing you to play it back, edit it using built-in tools, or share it with others.
Advanced Options
While the built-in screen recording feature offers a straightforward and effective solution, there are advanced options available for users seeking more granular control:
- Third-party Apps: Explore the App Store for third-party screen record apps that might offer additional features like editing tools, annotations, or live streaming capabilities.
- Assistive Touch: If you have difficulty using the touch screen gestures for accessing the Control Center, you can enable “Assistive Touch” in the Accessibility settings, providing an on-screen button for screen recording.
Screen Recording on Different iPhone Models and iOS Versions
While the process of screen recording remains largely consistent across various iPhone models and iOS versions, there might be slight differences in the user interface and accessibility options.
a. iPhones with Face ID (iPhone X and later) and iOS 15 and above

You’ll find the screen recording button in the Control Center, accessible by swiping down from the top-right corner of the screen.
b. iPhones with Home Button (iPhone 8 Plus and earlier) and iOS 11 and above
● Navigate to Settings and tap on the Control Center.
● Locate “Customize Controls” and find Screen Recording. Tap the (+) sign next to it to add it to your Control Center.
● Swipe up from the bottom of the screen to open the Control Center.
The remaining steps for starting, stopping, and finding your recording remain identical to the previously mentioned instructions.
c. iPhones with iOS 10 or earlier
Unfortunately, iPhones running iOS 10 or earlier do not have the built-in screen recording functionality. However, you can achieve screen recording on these devices by utilizing
third-party apps available on the App Store. Remember to thoroughly research and choose reputable apps before downloading them.
Additional Tips for Optimizing Your Screen Recording Experience

● Orientation Lock: To prevent screen rotation during recording, enable orientation lock from the Control Center.
● External Microphone: For higher quality audio, consider using an external microphone connected to your iPhone.
● Clean Screen: Close unnecessary apps and notifications before recording to ensure a clutter-free screen.
Additional Notes
● Certain iPhone models might have slightly different screen layouts within the Control Center. General location and functionality of the screen recording button will remain consistent.
● Future iOS updates might introduce further refinements or modifications to the screen recording feature. It’s recommended to stay updated with the latest iOS version to benefit from any improvements or bug fixes.
For a dose of amazing content and the latest buzz worldwide, head over to freelyblogging.com!

